The Purchase Analysis bundle makes it easy to quickly build multiple reports at once that you can share with your clients. You can begin to create a purchase analysis one of two ways. To see how to create this report in Client Manager, click here.
Adding a Client and Property Info
1. Choose your client's name from the drop-down.
- If adding a new client, click + Add new. You will need to provide their name; however, all other fields are optional. Please note that if you would like to share these reports via email, you will need to add their email address.
2. Click Add.

3. Enter an address, city, county, or zip code and choose an option from the dropdown.
4. Enter the Price of the property. Annual Property Tax and Monthly Home Insurance will be automatically calculated. These fields are editable.
- Optional: Add a Monthly Association Fee.
5. Select the appreciation calculation you would like to use.
Adding an Alternative Price
If comparing different prices on the same home:
1. Click + Add alternate price.
2. Add a Price. Property tax and monthly home insurance will automatically calculate, but you can edit these fields.
3. Click Add.
Adding Additional Locations
Next, you can add up to three different locations for which you can create and compare reports in your loan comparison.
1. Click Add second location or property.
2. Follow steps 5-6.
3. Click Add.
4. You can add one more location by clicking Add third location or property.
5. Click Next to add loan options.
Adding Loan Options
1. Choose a Property and/or Purchase Price from the drop down menu.
2. Click the View second loan terms option to quickly make a second loan for the same property.
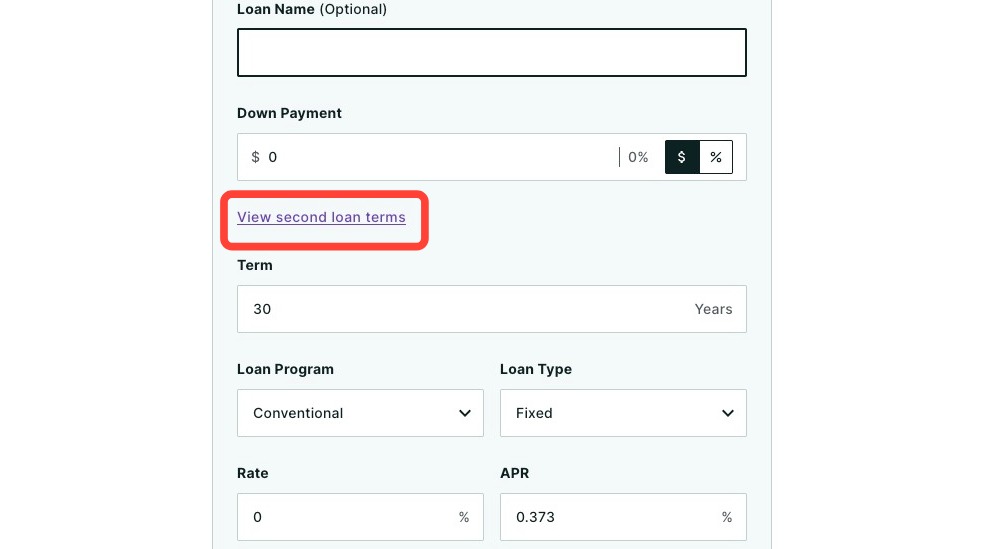
3. Enter the details about the second loan and then click Update. The second loan Amount will then appear in the loan details.
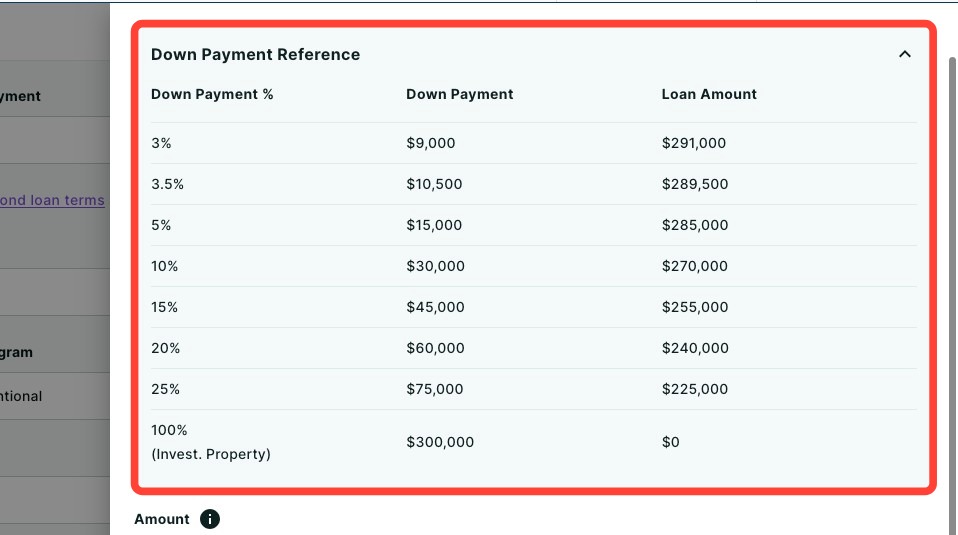
Helpful Tip: Click the Down Payment Reference drop-down to quickly view common down payment percentages and their corresponding loan amounts.
4. Add the loan's details including:
- Loan Name (optional)
- Down Payment (select from drop down)
- Term (defaulted to 30 years)
- Loan Program (select from drop down)
- Loan Type (select from drop down)
- Rate
- Points (if applicable)
5. Depending on the loan type you selected, Monthly Mortgage Insurance, Mortgage Insurance Premium, Funding Fee, Guarantee Fee and Upfront MIP will be automatically calculated, but these fields are editable.
6. Use the checkbox below to finance the Funding Fee, Guarantee Fee and Upfront MIP and add it to the loan amount.
7. Enter Closing Costs, Credits, and Prepaid & Escrows amounts.
- Option to Use worksheet.
8. Click the Add (number) loan option to add additional loans. You can add a total of five loan options.
8. Repeat steps 1-6 until all desired loans are added, and click Save after inputting the details of each loan.
9. Click Next once you have completed adding your loan options.
10. Choose which loan you would like to use in your Cost of Waiting analysis.
11. Click Next.
Add Co-branding (Optional)
You have the option to add an agent's co-branding to your Purchase Analysis report. Their co-branding will also be displayed on the cover report. To add a co-branding agent to your client’s purchase analysis report:
1. To add a referral partner's co-branding, click the drop-down below.

2. Select an agent from the drop-down, or choose a new co-branding parter by clicking + Add new co-branding partner.
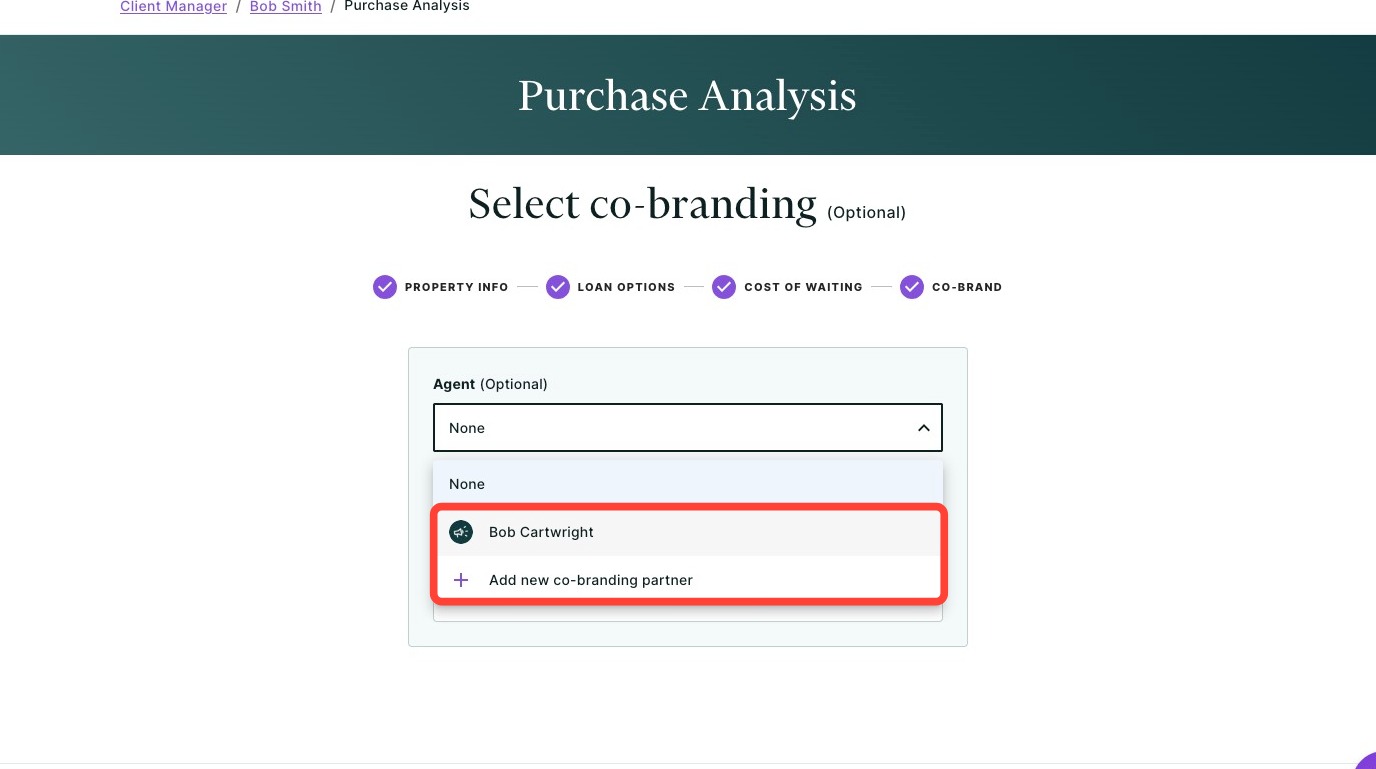
3. Choose how you would like the co-branding to be displayed on your reports.

4. Click Next.
Your Purchase Analysis will then be generated along with a Loan Comparison, Cost of Waiting and Buy vs Rent report.
Reviewing your Report
You can hide reports from your client's view by clicking on the eye icon, as seen below.
To share the bundle with your client, click Share in the top right hand corner of the page. Learn more about sharing by clicking here.
Editing your Reports
Need to make some edits to your reports? You can click on a report’s tile to view or edit the report. Once you have reviewed or edited the report, you can navigate back to your Purchase Analysis bundle by clicking Purchase Analysis in the top left hand corner of the page.
Sharing the Results
To share the completed report, click Share. A dropdown menu will appear.
- Click Download to download the report as a PDF.
- Click Send a link via email with an optional video recording (not available for some users depending on their company permission settings).
- Click Host a meeting to virtually meet to discuss the report with your client.
- Click Record a Video to provide your client with a clear walkthrough of the report along with your own insights and context.
To learn more about sharing your report, click here.
Still have questions or need help? Contact our support team by clicking here.